


Before you leave...
Take 20% off your first order
20% off
Enter the code below at checkout to get 20% off your first order
🚚Free shipping Orders $39+🎁
Up to a 1-year Warranty 🛡️
Free Returns within 30 days🚛


• 🚚Free shipping l Orders $39+
• 🛡️Up to a 1-year Warranty
• 📦Free Returns within 30 days
Couldn't load pickup availability
PAY WITH EASE
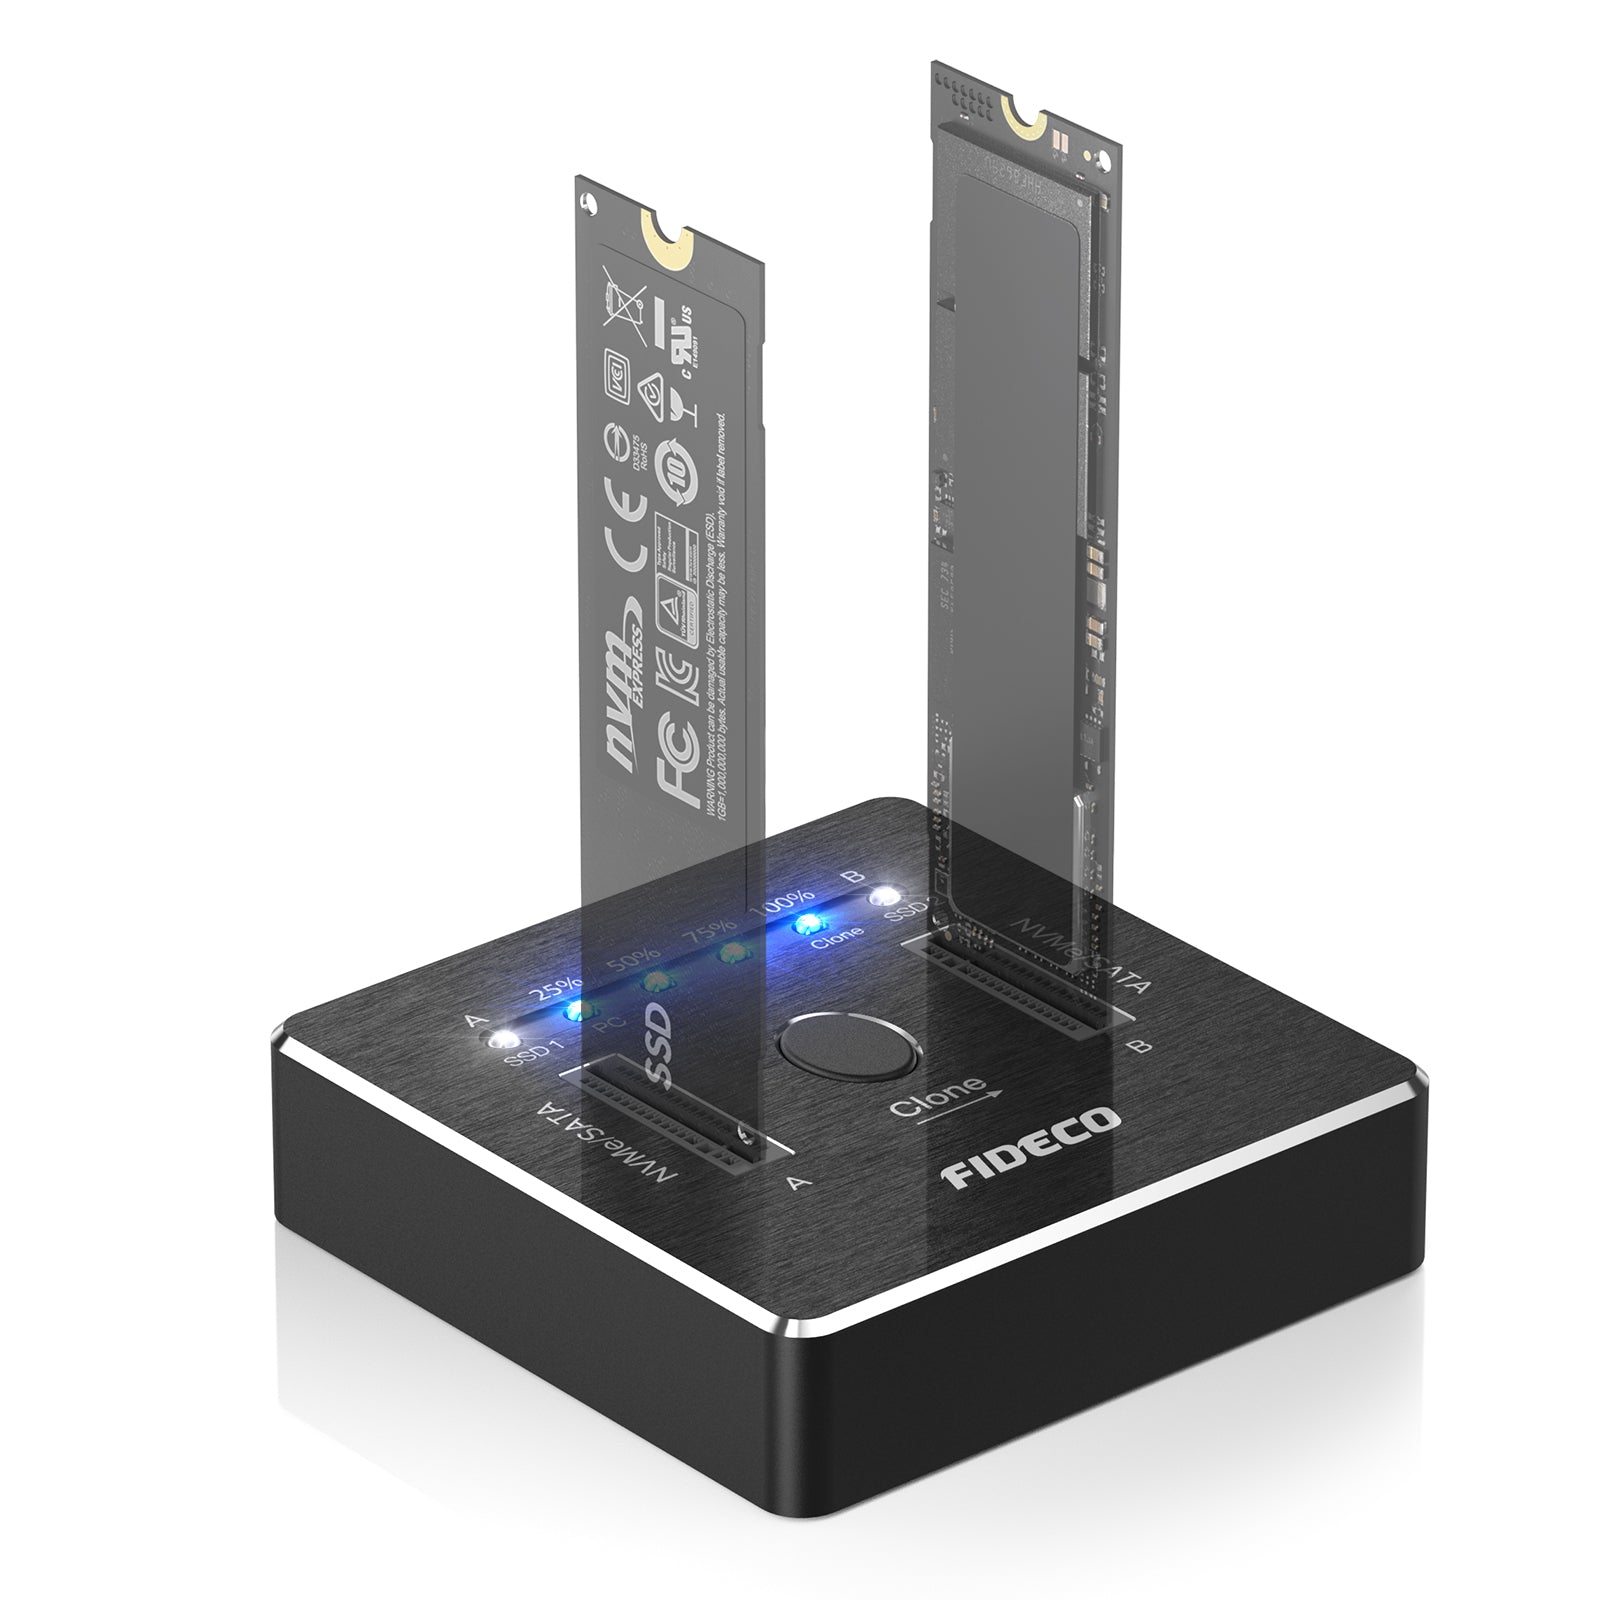
FIDECO Dual-Bay NVMe SATA Docking Station, Lay-Flat External Hard Drive Docking Station for M2 SSD Support Offline Clone Function and Tool-Free Installation.
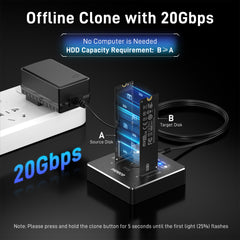
Off-line Cloning, Fast Heat Dissipation
Material: Aluminum alloy Transmission
Speed: 20Gbps (Theoretical speed)
Compatibility: M.2 PCIe NVMe SSD with M-Key or M+B Key and M.2 SATA SSD with M+B Key
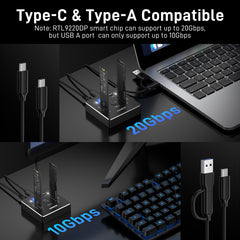
Interface: USB3.2 Gen2
Compatible Systems: Windows/Mac/Linux

1. To access M.2 SSD with a PC: You’re ready to go once you attach power and Type-C-C-A USB. Carefully insert the SSD into the slot(s) of your choice and push the power button on the back of the dock. Wait a few seconds, and the dock should be enumerated in Windows. Depending on the state of the SSD, you’ll either need to go to Drive Manager to initialize and format the SSD’s, or they could just pop-up in Explorer, ready to use.
2. For Standalone Duplication: Plug the target SSD into Slot B and plug the source SSD into slot A (the end were the power adapter connects). Target SSD capacity must be Larger than the Source SSD capacity. Press and hold the button for 3-5 seconds to begin the clone process. LED’s on the front top of the dock indicate clone progress – 25%, 50%, 75% and 100%.
Warm Tips

Supported SSD:
FIDECO NVMe SATA SSD Docking Station can support M.2 PCIe NVMe SSD with M-Key or M+B Key and M.2 SATA SSD with M+B Key. The supported M.2 SSD sizes are 2230/2242/2260/2280/22110. Just one dual NVMe SATA SSD dock can meet your needs of using different sizes of SSDs.

Step 1
1. Before cloning, disconnect the USB cable from the device.
2. Plug the source M2.NVME SSD in Slot A and the target M2.NVME SSD in Slot B.
Note: The capacity of Target SSD needs Larger than the source SSD. Target>Source
Step 2
1. Connect the power adapter to the enclosure
2. Press the power button.
3. Hold the clone button for 3-5 seconds until LED indicator begins to flash.
Step 3
The LED indicators show the cloning process from 25%,50%,75% and 100%.
When all four LEDs stop flashing, the cloning is finished. This process may take a long time which mainly depends on the capacity of SSD.

Q1: Why does the clone operation quit immediately?
This happens mainly for two different reasons:
(1) the target drive is new and has not been initialized, or (2) the target drive is smaller than the cloned drive.
When cloning is started, the device checks the source and target drives. If the target is not initialized or is smaller than the source, the cloning operation is aborted.
Solutions:
If the SSD is new, it needs to be formatted and initialized before it can be used.
1) Connect the device to a computer.
2) Right-click This PC -> Management -> Disk Management.
3) Right-click the target drive (the one that shows as uninitialized), and select Initialize from the drop-down menu.
4) Disconnect the device from the computer, and try cloning again.
Q2: Does the M2288 with power adapter?
Yes, M2288 comes with 5V3A power adapter.
Q3: How long does each clone take?
Clone 256GB M.2 SSD to 2TB SSD about 4 minutes as tested.
You may return most new, unopened items within 30 days of delivery for a full refund. We'll also pay the return shipping costs if the return is a result of our error (you received an incorrect or defective item, etc.).
You should expect to receive your refund within four weeks of giving your package to the return shipper, however, in many cases you will receive a refund more quickly. This time period includes the transit time for us to receive your return from the shipper (5 to 10 business days), the time it takes us to process your return once we receive it (3 to 5 business days), and the time it takes your bank to process our refund request (5 to 10 business days).
If you need to return an item, simply login to your account, view the order using the "Complete Orders" link under the My Account menu and click the Return Item(s) button. We'll notify you via e-mail of your refund once we've received and processed the returned item.
We can ship to virtually any address in the world. Note that there are restrictions on some products, and some products cannot be shipped to international destinations.
When you place an order, we will estimate shipping and delivery dates for you based on the availability of your items and the shipping options you choose. Depending on the shipping provider you choose, shipping date estimates may appear on the shipping quotes page.
Please also note that the shipping rates for many items we sell are weight-based. The weight of any such item can be found on its detail page. To reflect the policies of the shipping companies we use, all weights will be rounded up to the next full pound.
This FIDECO USB 3.2 Gen 2 X 2, 20Gbps, Dual NVMe SATA SSD Enclosure and M.2 Duplicator/Cloning Tool is... AWESOME!!Whether you need to clone a disk directly from your PC or laptop to a new M.2 SSD attached to this device or use it as a standalone direct duplicator via its dual M.2 docking ports, this amazing tool does the job FLAWLESSLY!I cannot RAVE about this product enough to do it justice. I am thoroughly impressed! I used it to upgrade from a 1 Terabyte M.2 SSD to a 4 Terabyte M.2 SSD, and it was as simple as plugging both M.2 drives into the unit itself and literally pressing a button.If cloning in "PC Mode" via the built-in 20Gb per second USB interface, the instructions recommend using the Windows Disk Management Wizard to "Initialize" your new drive before beginning the cloning process.Personally, I used the direct "Offline Cloning Mode" (please see the included video), which required no initialization. I just connected both M.2 SSDs to the designated ports on the FIDECO cloning device, plugged the unit into a standard 110v AC power outlet using the provided 5 volt power adapter, switched on the main power switch located on the rear of the device, pressed and held the "CLONE Button" for five seconds until the 25% light began to flash, and then sat back to WATCH THE MAGIC HAPPEN!The video I created to illustrate this data transfer is a shortened version of the entire process, which actually lasted about ten to fifteen minutes from start to finish. In that short amount of time, the FIDECO Cloning tool moved approximately five-HUNDRED Gigabytes of data from my 1TB M.2 SSD to my brand new 4TB M.2 SSD, and when I installed the newly-cloned 4TB M.2 SSD into my PC, it functioned SUPERBLY! Every BIT of data was perfectly and precisely duplicated, right down to the saved log-in password which enables me to avoid having to enter my password every time I boot or reboot my PC.ONE IMPORTANT NOTE: If you are cloning from a smaller-capacity SSD to a larger-capacity SSD, it will be necessary to use "Windows Disk Management" to either partition the remaining space on the new, larger-capacity SSD with its own new drive letter, or to "MERGE" the space into the rest of the rest of the drive. For example, in my case I cloned a 1TB drive onto a 4TB drive, resulting in my new 4TB drive "appearing" to only have a 1TB capacity. This is because the FIDECO Cloning Tool "mirrors" the source disk perfectly. Think of it like putting a four-inch wide photo into a sixteen-inch wide frame; the blank space is still there, but the 4" photo does not automatically "stretch" to fill it. THIS CONDITION IS UNAVOIDABLE, AND THE FIDECO DEVICE IS WORKING AS INTENDED. As mentioned above, there are two ways to solve this condition. Personally, I prefer to NOT have multiple drive letters assigned to a single SSD, so I chose to "Extend" and "merge" the unused space on the drive into the newly-cloned data that the FIDECO device duplicated on it. PLEASE NOTE that ONLY CONTIGUOUS drive-space can be "extended" and merged using the "Windows Disk Management" tool. This means that any unused section of a drive MUST be directly adjacent to the section with which you wish it to be extended to and merged. If there is any data written to the drive between these two sections (such as "Windows Recovery Data"), those sections cannot be merged without either moving or deleting the data written between them.To resolve this issue, I completed the following steps:WARNING AND DISCLAIMER: Follow these steps AT YOUR OWN RISK! The author of this review assumes NO LIABILITY OR RESPONSIBILITY for loss or damage resulting from ANY TIPS contained within this review. The tips and advice contained herein are FOR REFERENCE ONLY. Please CONSULT A PROFESSIONAL if you are in any way UNSURE of your ability to successfully perform any of the steps provided in this review.STEP ONE: Create a USB Windows Recovery Drive using a 16GB Removable USB "Thumb" Drive. Perform a web search such as "How to create a Windows Recovery on removable media" to obtain instructions regarding how to complete this process. It's pretty easy, just click-click-click and done.STEP TWO: Once the "Windows Recovery" is safely tucked away on your removable USB drive, it will be safe to delete the recovery partition on your newly cloned main operating system drive. Normally, the process very simply involves right-clicking the offending partition and then selecting "Delete". Unfortunately however, recovery partitions are "protected" and must be deleted using "command-line entries". This process sounds complex, but is actually very simple.Start by opening "Command Prompt (Admin)" by right-clicking the Windows "Start" Button, then complete the following.FIRST, type "Reagentc /disable" (without the quotation marks). This will disable REAGENTC.EXE and allow you to proceed to the next step of the process.SECOND, type "diskpart" (without the quotation marks) and hit the Enter key. This will switch the Command Pro...
Before anything, I just want to say this device has a really strange smell to it, that wasn't pleasant at all but other than that this device does exactly what it has to do, this was very easy to use, the instructions were clear, both m.2's fit perfectly, connectivity is good, I like the design and the speed wasn't so bad it took about 30 minutes to transfer all my games but obviously in the video I sped it up just to show that it works. Like I said this is a must to have it's extremely convenient.One thing I would recommend that should be added to the instructions is when it comes to using the rest of the drive if you're cloning to a bigger m.2 since this only clones the capacity of the original and leaves the rest unallocated is to not resize the new partition or create new one volume but to just right click on the cloned partition and expand the volume.
Simple and sweet and no needed software. The only thing is. Going from 1 to 2 TB it cloned it as 2 1TB drives which is fine by me. Absolutely tons more efficient tho the software that I��ve used before.
Item arrived quickly and in good condition. I cloned a 1TB drive to a 4TB drive and it worked flawlessly. It took about 20 minutes to complete. The controls are simple. Turn on the device, I did not see any lights until I pressed the clone button. 2 white ssd lights and 1 blue 100% light. long press the clone button, about 3 seconds and the 25% light started flashing. 20 minutes later I reinstalled the SSD into the laptop. Took a while for it to boot, had to restart once. All is good.Once the laptop booted up I went to setting and searched for disk management. I chose "create and format hard disk partitions" this opens "Disk Management" you will see a section of one disk that says "Unallocated" choose this block and format it. It will let you choose quick format and set the drive letter. You will probably want to choose something over F: because external drives are usually E: and F:All in all, It's a quick and easy way to clone a M.2 SSD even you C: drive.
Although I purchased a Kingston 1TB NVMe SSD to clone another Kingston 1TB NVMe SSD, the Fideco failed to clone because apparently the two SSD's were slightly different size and the target was slightly smaller. So this makes it harder to successfully purchase a replacement known to work without going to a larger size. Fortunately Kingston is one of the brands that has a free Acronis clone software, so I was able to clone the 1TB system SSD to the target SSD in the Fideco cloner. The Acronis software takes care of SSD size mismatch without throwing away excess space in a direct clone. Acronis supports a free clone version for several different SSD manufacturers.
Thanks for subscribing!
This email has been registered!
Take 20% off your first order
Enter the code below at checkout to get 20% off your first order